 Here's an article
 from a French anarchist describing how his (encrypted) laptop was seized after he was arrested, and material from the encrypted partition has since been entered as evidence against him. His encryption password was supposedly greater than 20 characters and included a mixture of cases, numbers, and punctuation, so in the absence of any sort of opsec failures this implies that even relatively complex passwords can now be brute forced, and we should be transitioning to even more secure passphrases.
Or does it? Let's go into what LUKS is doing in the first place. The actual data is typically encrypted with AES, an extremely popular and well-tested encryption algorithm. AES has no known major weaknesses and is not considered to be practically brute-forceable - at least, assuming you have a random key. Unfortunately it's not really practical to ask a user to type in 128 bits of binary every time they want to unlock their drive, so another approach has to be taken.
This is handled using something called a "key derivation function", or KDF. A KDF is a function that takes some input (in this case the user's password) and generates a key. As an extremely simple example, think of MD5 - it takes an input and generates a 128-bit output, so we could simply MD5 the user's password and use the output as an AES key. While this could technically be considered a KDF, it would be an extremely bad one! MD5s can be calculated extremely quickly, so someone attempting to brute-force a disk encryption key could simply generate the MD5 of every plausible password (probably on a lot of machines in parallel, likely using GPUs) and test each of them to see whether it decrypts the drive.
(things are actually slightly more complicated than this - your password is used to generate a key that is then used to encrypt and decrypt the
actual encryption key. This is necessary in order to allow you to change your password without having to re-encrypt the entire drive - instead you simply re-encrypt the encryption key with the new password-derived key. This also allows you to have multiple passwords or unlock mechanisms per drive)
Good KDFs reduce this risk by being what's technically referred to as "expensive". Rather than performing one simple calculation to turn a password into a key, they perform a
lot of calculations. The number of calculations performed is generally configurable, in order to let you trade off between the amount of security (the number of calculations you'll force an attacker to perform when attempting to generate a key from a potential password) and performance (the amount of time you're willing to wait for your laptop to generate the key after you type in your password so it can actually boot). But, obviously, this tradeoff changes over time - defaults that made sense 10 years ago are not necessarily good defaults now. If you set up your encrypted partition some time ago, the number of calculations required may no longer be considered up to scratch.
And, well, some of these assumptions are kind of bad in the first place! Just making things computationally expensive doesn't help a lot if your adversary has the ability to test a large number of passwords in parallel. GPUs are extremely good at performing the sort of calculations that KDFs generally use, so an attacker can "just" get a whole pile of GPUs and throw them at the problem. KDFs that are computationally expensive don't do a great deal to protect against this. However, there's another axis of expense that can be considered - memory. If the KDF algorithm requires a significant amount of RAM, the degree to which it can be performed in parallel on a GPU is massively reduced. A Geforce 4090 may have 16,384 execution units, but if each password attempt requires 1GB of RAM and the card only has 24GB on board, the attacker is restricted to running 24 attempts in parallel.
So, in these days of attackers with access to a pile of GPUs, a purely computationally expensive KDF is just not a good choice. And, unfortunately, the subject of this story was almost certainly using one of those. Ubuntu 18.04 used the LUKS1 header format, and the only KDF supported in this format is
PBKDF2. This is not a memory expensive KDF, and so is vulnerable to GPU-based attacks. But even so, systems using the LUKS2 header format used to default to
argon2i,
again not a memory expensive KDFwhich is memory strong, but not designed to be resistant to GPU attack (thanks to the comments pointing out my misunderstanding here). New versions default to argon2id, which is. You want to be using argon2id.
What makes this worse is that distributions generally don't update this in any way. If you installed your system and it gave you pbkdf2 as your KDF, you're probably still using pbkdf2 even if you've upgraded to a system that would use argon2id on a fresh install. Thankfully, this can all be fixed-up in place. But note that if anything goes wrong here you could lose access to all your encrypted data, so before doing anything make sure it's all backed up (and figure out how to keep said backup secure so you don't just have your data seized that way).
First, make sure you're running as up-to-date a version of your distribution as possible. Having tools that support the LUKS2 format doesn't mean that your distribution has all of that integrated, and old distribution versions may allow you to update your LUKS setup without actually supporting booting from it. Also, if you're using an encrypted /boot, stop now - very recent versions of grub2 support LUKS2, but they don't support argon2id, and this will render your system unbootable.
Next, figure out which device under /dev corresponds to your encrypted partition. Run
lsblkand look for entries that have a type of "crypt". The device above that in the tree is the actual encrypted device. Record that name, and run
sudo cryptsetup luksHeaderBackup /dev/whatever --header-backup-file /tmp/luksheaderand copy that to a USB stick or something. If something goes wrong here you'll be able to boot a live image and run
sudo cryptsetup luksHeaderRestore /dev/whatever --header-backup-file luksheaderto restore it.
(Edit to add: Once everything is working, delete this backup! It contains the old weak key, and someone with it can potentially use that to brute force your disk encryption key using the old KDF even if you've updated the on-disk KDF.)
Next, run
sudo cryptsetup luksDump /dev/whateverand look for the
Version: line. If it's version 1, you need to update the header to LUKS2. Run
sudo cryptsetup convert /dev/whatever --type luks2and follow the prompts. Make sure your system still boots, and if not go back and restore the backup of your header. Assuming everything is ok at this point, run
sudo cryptsetup luksDump /dev/whateveragain and look for the
PBKDF: line in each keyslot (pay attention only to the keyslots, ignore any references to pbkdf2 that come after the
Digests: line). If the PBKDF is either "pbkdf2" or "argon2i" you should convert to argon2id. Run the following:
sudo cryptsetup luksConvertKey /dev/whatever --pbkdf argon2idand follow the prompts. If you have multiple passwords associated with your drive you'll have multiple keyslots, and you'll need to repeat this for each password.
Distributions! You should really be handling this sort of thing on upgrade. People who installed their systems with your encryption defaults several years ago are now much less secure than people who perform a fresh install today. Please please please do something about this.

comments
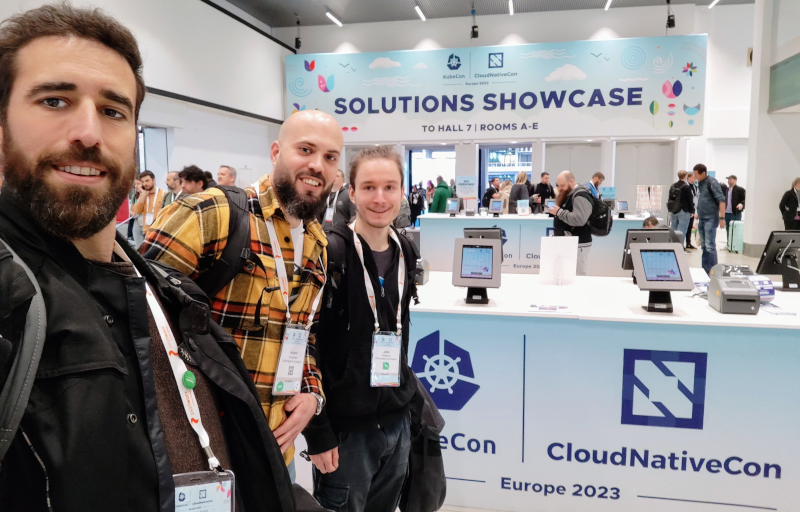
 Considering I ve created my own private cloud in my home as part of: wp-k8s: WordPress on privately hosted Kubernetes cluster (Raspberry Pi 4 + Synology)....
The post rpi-microk8s-bootstrap: Automate RPI device conversion into Kubernetes cluster nodes with Terraform appeared first on FoolControl: Phear the penguin.
Considering I ve created my own private cloud in my home as part of: wp-k8s: WordPress on privately hosted Kubernetes cluster (Raspberry Pi 4 + Synology)....
The post rpi-microk8s-bootstrap: Automate RPI device conversion into Kubernetes cluster nodes with Terraform appeared first on FoolControl: Phear the penguin.
 A first follow-up to the
  These instructions are for qotom devices
  Did you follow the instructions linked above in the prerequisites section? If not, take a moment to do so now.
 You may be warned that Rufus will be acting as dd.
 Don t forget to select the USB drive that you want to write the image to. In my example, the device is creatively called NO_LABEL .
 You may be warned that re-imaging the USB disk will result in the previous data on the USB disk being lost.
 Once the process is complete, the application will indicate that it is complete.
 You should now have a USB disk with the Proxmox installer image on it. Place the USB disk into one of the blue, USB-3.0, USB-A slots on the Qotom device so that the system can read the installer image from it at full speed. The Proxmox installer requires a keyboard, video and mouse. Please attach these to the device along with inserting the USB disk you just created.
 Press the power button on the Qotom device. Press the F11 key repeatedly until you see the AMI BIOS menu. Press F11 a couple more times. You ll be presented with a boot menu. One of the options will launch the Proxmox installer. By trial and error, I found that the correct boot menu option was UEFI OS
 Once you select the correct option, you will be presented with a menu that looks like this. Select the default option and install.
 During the install, you will be presented with an option of the block device to install to. I think there s only a single block device in this celeron, but if there are more than one, I prefer the smaller one for the ProxMox OS. I also make a point to limit the size of the root filesystem to 16G. I think it will take up the entire volume group if you don t set a limit.
Okay, I ll do another install and select the correct filesystem.
During the install, you will be presented with an option of the block device to install to. I think there s only a single block device in this celeron, but if there are more than one, I prefer the smaller one for the ProxMox OS. I also make a point to limit the size of the root filesystem to 16G. I think it will take up the entire volume group if you don t set a limit.
Okay, I ll do another install and select the correct filesystem.
 If you read this far and want me to add some more screenshots and better instructions, leave a comment.
 On etcd, performance and resource management
I attended a talk focused on etcd performance tuning that was very encouraging. They were basically talking
about the
On etcd, performance and resource management
I attended a talk focused on etcd performance tuning that was very encouraging. They were basically talking
about the 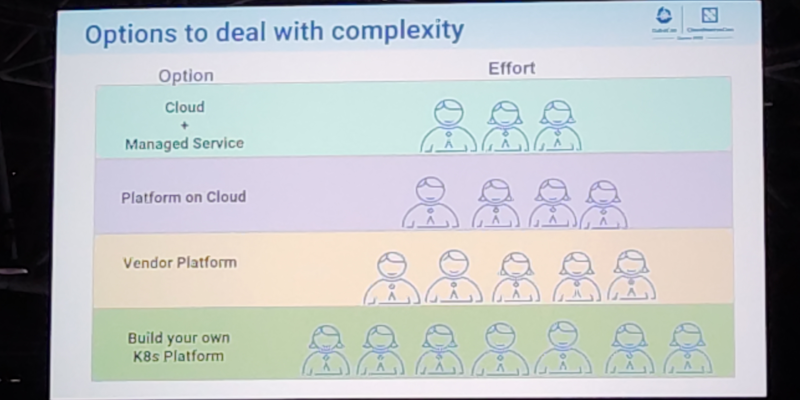 On jobs
I attended a couple of talks that were related to HPC/grid-like usages of Kubernetes. I was truly impressed
by some folks out there who were using Kubernetes Jobs on massive scales, such as to train machine learning
models and other fancy AI projects.
It is acknowledged in the community that the early implementation of things like Jobs and CronJobs had some
limitations that are now gone, or at least greatly improved. Some new functionalities have been added as
well. Indexed Jobs, for example, enables each Job to have a number (index) and process a chunk of a larger
batch of data based on that index. It would allow for full grid-like features like sequential (or again,
indexed) processing, coordination between Job and more graceful Job restarts. My first reaction was: Is that
something we would like to enable in
On jobs
I attended a couple of talks that were related to HPC/grid-like usages of Kubernetes. I was truly impressed
by some folks out there who were using Kubernetes Jobs on massive scales, such as to train machine learning
models and other fancy AI projects.
It is acknowledged in the community that the early implementation of things like Jobs and CronJobs had some
limitations that are now gone, or at least greatly improved. Some new functionalities have been added as
well. Indexed Jobs, for example, enables each Job to have a number (index) and process a chunk of a larger
batch of data based on that index. It would allow for full grid-like features like sequential (or again,
indexed) processing, coordination between Job and more graceful Job restarts. My first reaction was: Is that
something we would like to enable in  After
After  Update on 2023-03-23: thanks to Daniel Roschka for mentioning the
  So What did I do? I compiled Linux repeatedly, on several of the
machines I had available, varying the
So What did I do? I compiled Linux repeatedly, on several of the
machines I had available, varying the 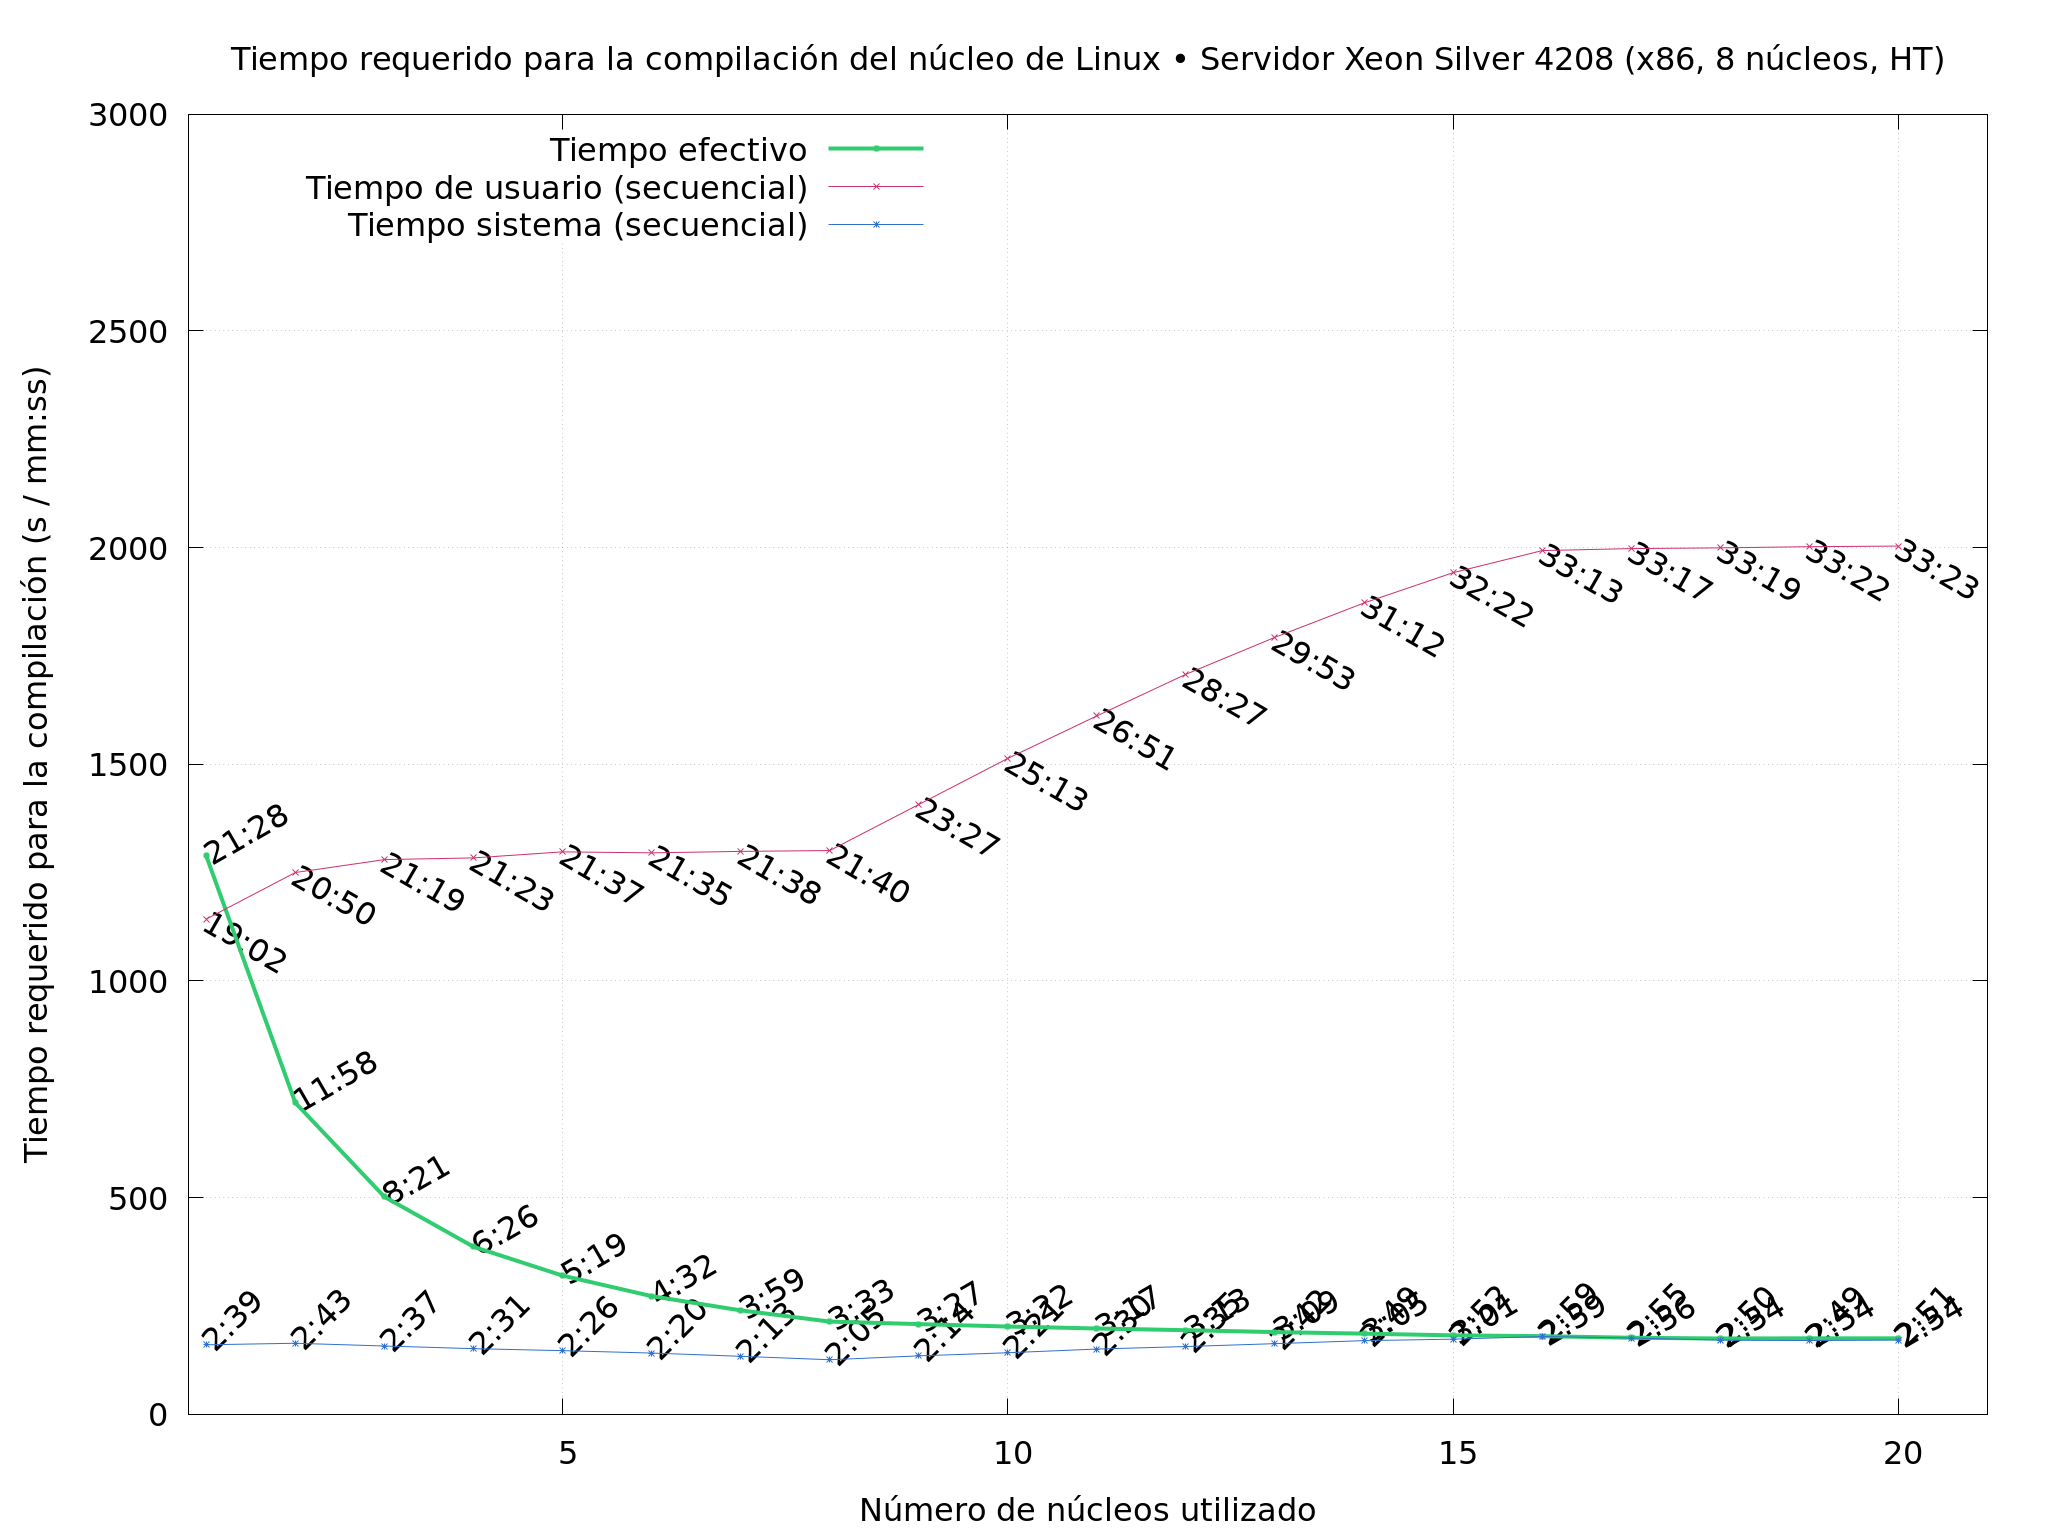
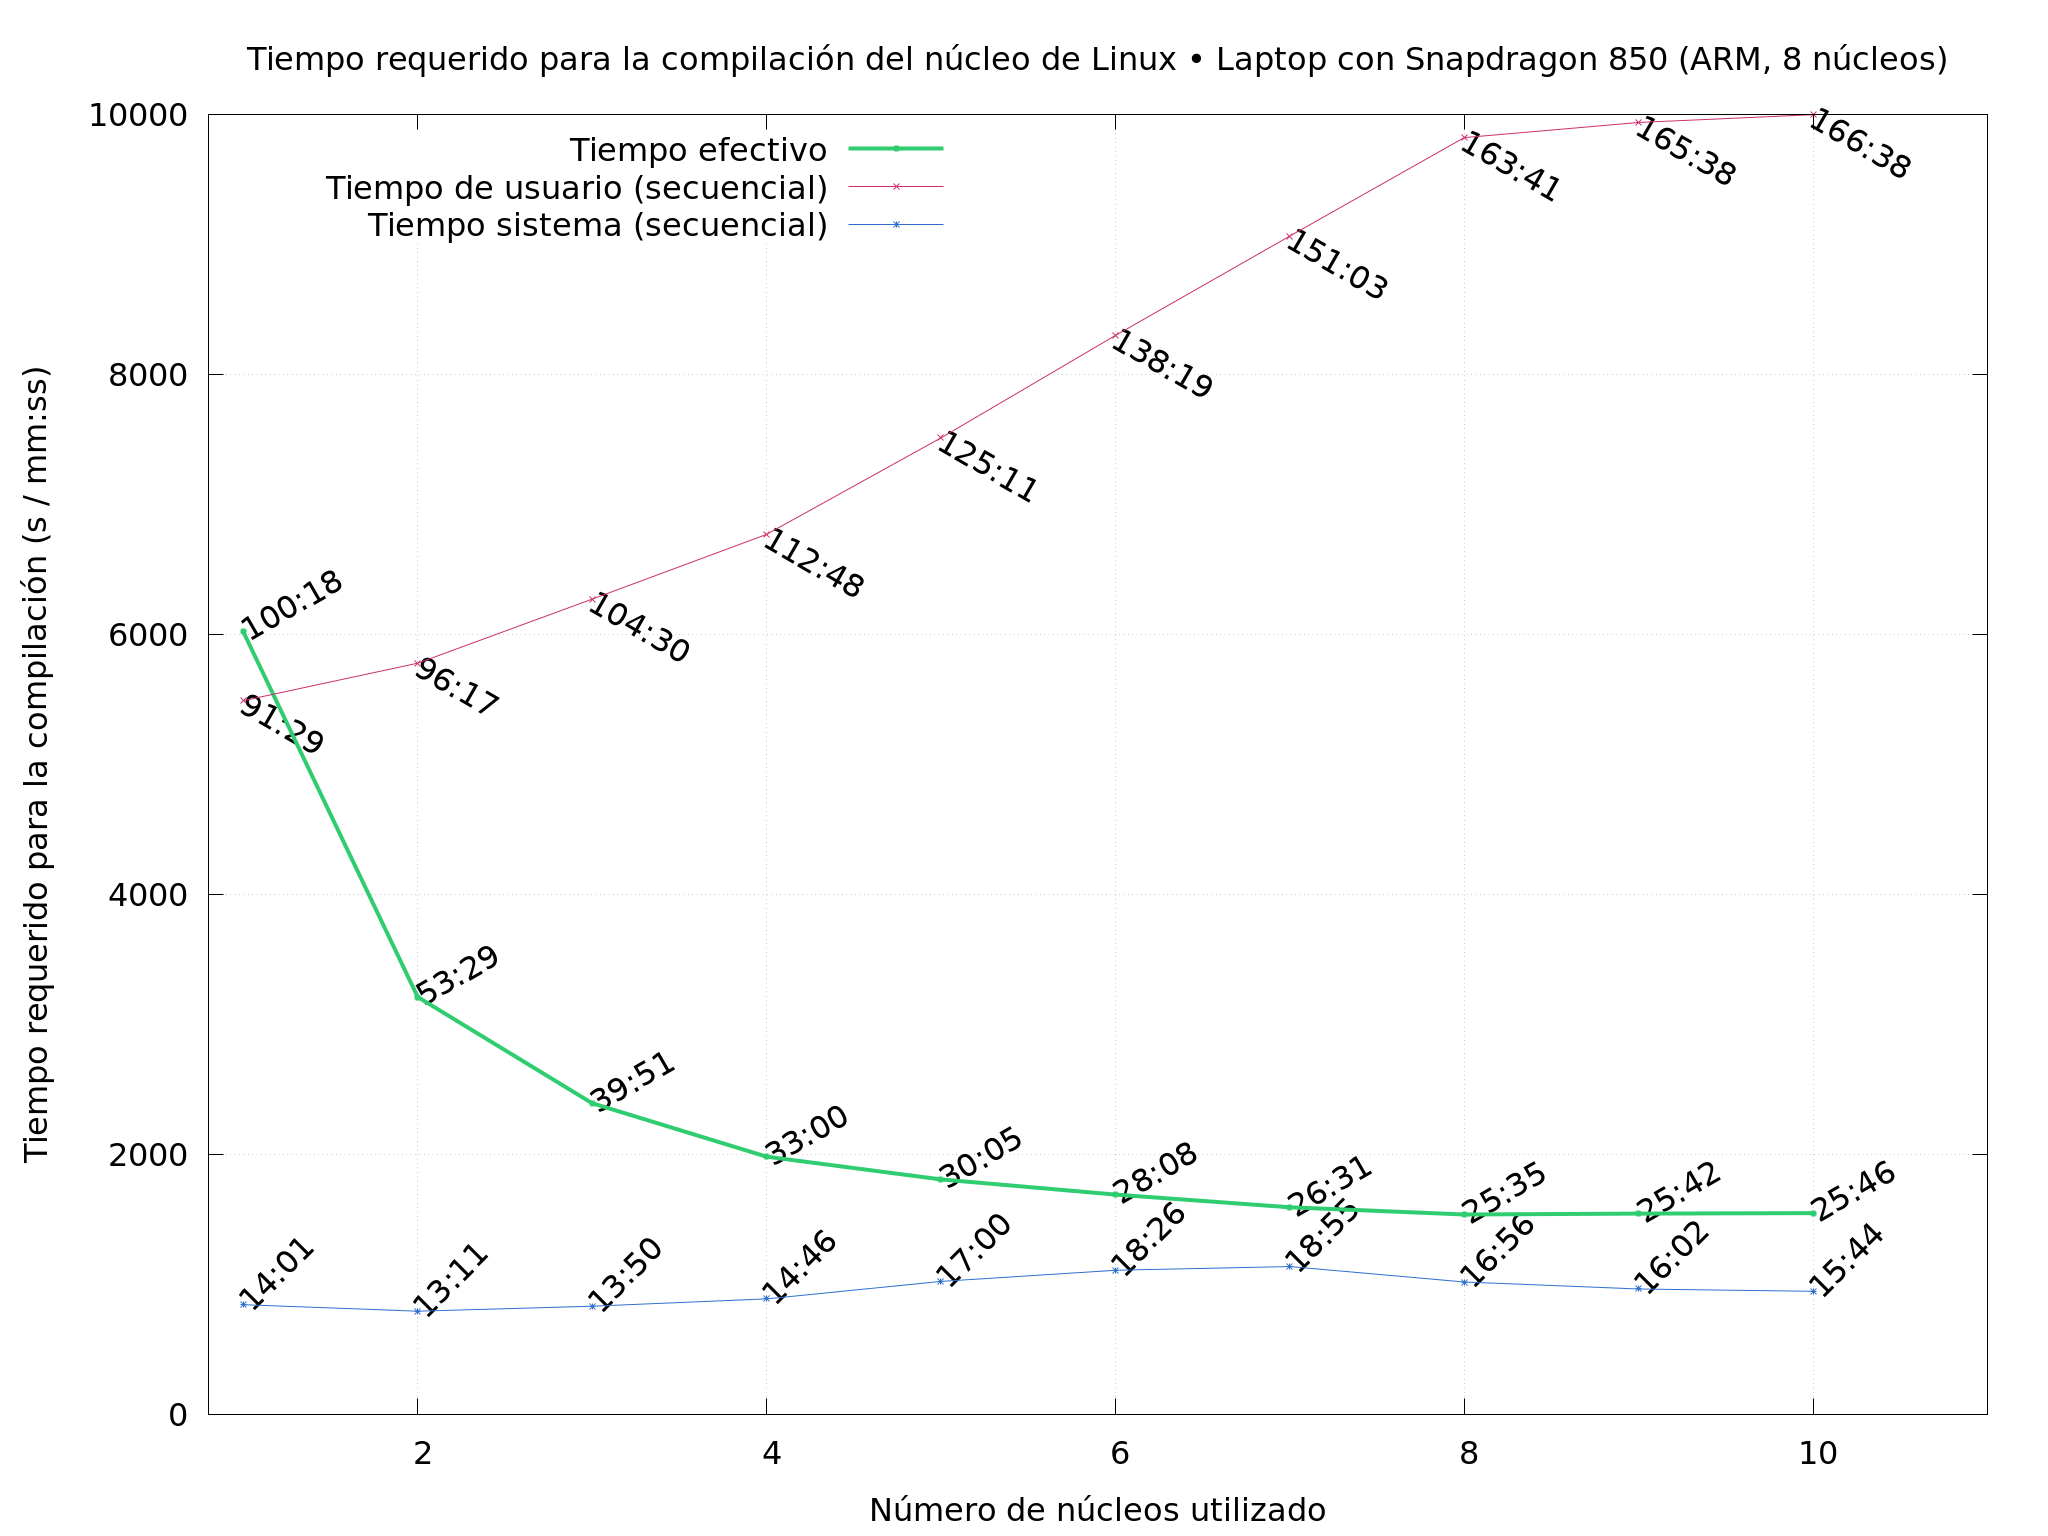

 in the
 Back in September last year I chose to back the
 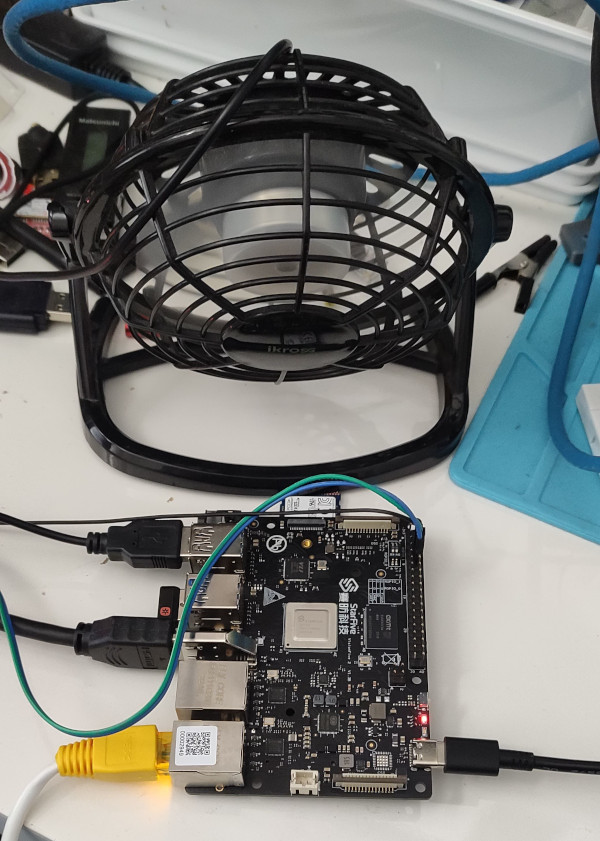 I haven t seen any actual stability problems, but I wouldn t want to run for any length of time like that. I ve ordered a heatsink and also realised that the board supports a Raspberry Pi style PoE Hat , so I ve got one of those that includes a fan ordered (I am a complete convert to PoE especially for small systems like this).
With the desk fan setup I ve been able to run the board for extended periods under load (I did a full recompile of the Debian 6.1.12-1 kernel package and it took about 10 hours). The M.2 slot is unfortunately only a single PCIe v2 lane, and my testing topped out at about 180MB/s. IIRC that is about half what the slot should be capable of, and less than a 10th of what the SSD can do. Ethernet testing with
I haven t seen any actual stability problems, but I wouldn t want to run for any length of time like that. I ve ordered a heatsink and also realised that the board supports a Raspberry Pi style PoE Hat , so I ve got one of those that includes a fan ordered (I am a complete convert to PoE especially for small systems like this).
With the desk fan setup I ve been able to run the board for extended periods under load (I did a full recompile of the Debian 6.1.12-1 kernel package and it took about 10 hours). The M.2 slot is unfortunately only a single PCIe v2 lane, and my testing topped out at about 180MB/s. IIRC that is about half what the slot should be capable of, and less than a 10th of what the SSD can do. Ethernet testing with  To be able to investigate and work on the the measured boot features I have switched from grub to systemd-boot (sd-boot).
This initial step is optional, but it is useful because this way
To be able to investigate and work on the the measured boot features I have switched from grub to systemd-boot (sd-boot).
This initial step is optional, but it is useful because this way 


